Mouse P.I. For Hire Guide: Every Optional Investigation
The complete guide to finding and finishing every missable side job, earning extra coins, and unlocking weapon schematics in Mouseburg.
If you just follow the main objective markers, you are leaving a massive amount of cash and weapon schematics on the table. The locals have plenty of dirty work for you to handle on the side.
There are fourteen side jobs in Mouse P.I. For Hire, and almost all of them are entirely missable. You have to actively talk to the NPCs in the P.I. Office hub between every single mission to trigger them. If you see an icon hovering over someone’s head, talk to them until they repeat themselves. Sometimes a single NPC holds multiple jobs at once. The game rarely holds your hand or gives you a waypoint for these objectives, so keep your eyes peeled while you are shooting your way through the main case files.
Show Some Culture, Jack
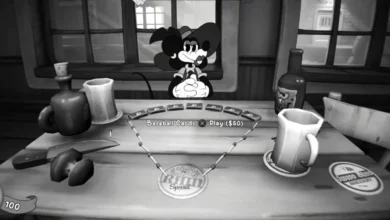
Tammy is hanging out across from the Little and Big bar. She wants a photo of the Opera House since she has never been allowed inside to see the glamour. This job pays 100 Coins, and you complete it during the Gumshoe In The Opera mission.
You do not even have to hunt for this one. Towards the end of the mission, you will find yourself climbing across the balcony seating while the entire building burns to the ground. Jack will actively mention snapping a photo of the chaos below. A prompt will appear on your screen. Take the photo, finish the level, and hand it to Tammy back at the hub.
Blueprints Please
Tammy also needs you to grab some blueprints while you are trudging through the sewers during the Cheeseball Sub mission. This one actually requires exploration, but the reward is two precious weapon schematics.
Towards the very end of the mission, you will find the final typewriter. It sits between a ladder on your right and a locked door on your left. Save your game immediately. The door features a timed spike lock, and if you fail the minigame, it jams permanently. Once inside, pull the switch to turn on the massive fan. Use your propeller tail to ride the updraft to a high platform covered in burning barrels. Jump into the single suspended train car hanging in the air to find the blueprints.
By the way, if you want to know exactly what to do with all those upgrade materials you are collecting, check out my ultimate arsenal and weapons guide right here.
The Things We Keep
Wanda at the Little and Big Bar needs you to figure out what happened to a missing friend. You tackle this during the Once Upon A Time By Tinsel Bros mission for a reward of 150 Coins.
You need to complete two specific steps for this gig:
- First, right after defeating the initial wave of goons on the main street, look for an overturned truck that is currently on fire. Snap a photo of the wreckage.
- Second, much later in the level, you will push through a theater set where enemies are running under falling objects. Keep moving until you pass a set featuring a bar and a couch. You will enter a small hallway. Before opening the story locked door ahead, look to your left. Grab the small envelope resting on the floor near a crate cart and report back to Wanda.
They Call It Azurro Burgerro
John Brown needs you to cook a burger for him using a very specific heat source during the A Bit of Curd And Pepper mission. This earns you two Prize Tokens.
When you head to the Opera Ruins, you are looking for a hot, ashy spot. Look up from the center of the main room to the western wall. You will spot a hole in the wall with a plank sticking out. Use the grappling hooks to reach that level. Look for a hole in the floor leading down a set of stairs covered in skeletons. Walk to the base of those stairs, and a prompt will appear letting you cook the meat. Hold the button until the game registers it as fully cooked, then bring the charred mess back to John.
Fishy Business
John wants you to retrieve a can of highly suspect herring from Wallop Bay during the Saltwater Cambozo mission. The reward is another Prize Token.
After you use the Loose Cannon weapon to destroy the tall building, you will push into an area filled with a pharmacy and other shops. Clear the enemies, and look for a small square alleyway between the buildings. The wall is tagged with a massive white heart with a dagger through it. Head into the house attached to that graffiti and walk out onto the balcony. The rancid herring is sitting right there. Grab it and try not to breathe through your nose.
Imported Goods
Cornelius Stilton needs you to intercept a package from the Customs office in Wallop Bay, also during the Saltwater Cambozo mission. He pays a solid 400 Coins for the effort.
You will not find this area until later in the mission. Jack will explicitly mention customs dialogue when you arrive. The area is a large courtyard centered around a water tower. You will have a hot pepper buff available as soon as you drop in. Clear the mobsters, then head to the eastern corner of the courtyard. Smash the crates blocking a locked door, pick the lock, and walk inside. Grab the Baseball Card off the window sill, then head into the back room to find Stilton’s requested goods.
Perfect Bog Fondue
John is desperate for a fondue recipe, and you have to dig it out of the wetlands during the Damp Evidence mission. This gets you two more Prize Tokens.
Push through the mines until you encounter the Old Cheeslegger. He agrees to help you, but only if you track down three specific boxes for him.
| Item | Exact Location |
| First Box | Right after re entering the mines, spot the healing point and the beware sign. Look over the edge to the left and drop down to the lower path to grab the box before jumping into the central hole. |
| Second Box | While exploring the abandoned mansion in the mines, find the room with the dining table and fireplace. Check the opposite end of the room before you smash through the breakable wall. |
| Third Box | Sitting directly on top of a sunken boat in the wetlands area, which you access right after defeating the cultist boss. |
Once you have all three, speak to the Old Cheeslegger again near the police cars at the end of the level to secure the recipe.
If you are hunting for more tips or just want to breeze through your backlog, check out my full collection of gaming guides right here. Need more help surviving Mouseburg? Check out our The Ultimate Mouse P.I. Beginner’s Guide for a complete breakdown of weapons, missions, and farming routes.