Palworld Guide: How to Find All 4 Yakumo Effigies (And Avoid the Achievement Bug)
Track down all four Yakumo Effigies in Palworld 1.0, but beware of a nasty progression bug that can permanently lock you out of your achievement.
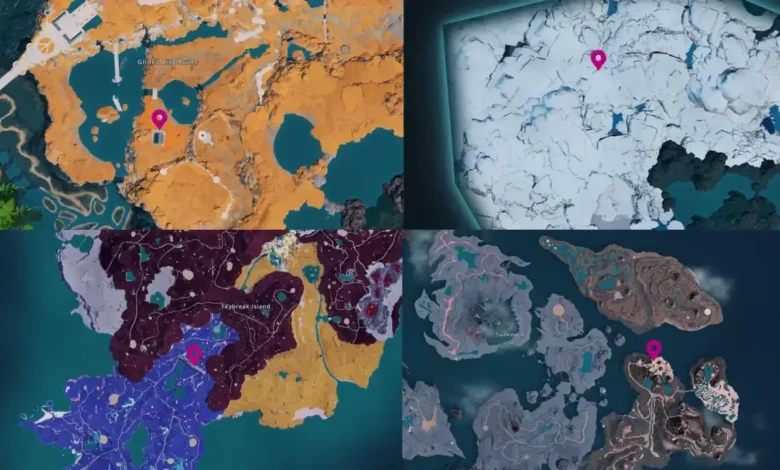
Quick Answer: Do not spend any Yakumo Effigies at a Pal Statue until you have all four in your inventory at the exact same time. Spending even one early can permanently lock you out of the achievement. You will find these four collectibles scattered across the Feybreak Oculus Gate, the Floating Islands, the World Tree Ice Region, and the Gilded City Ruins.
Tracking down the new Yakumo Effigies in Palworld 1.0 sounds like a standard treasure hunt, but there is a massive catch right now. Before you even think about fast traveling across the map to grab these, you need to know about a nasty bug that is robbing players of their hard earned achievement.
The Pal Statue Trap: Read This First
Right now, the game seems to check your inventory for all four effigies simultaneously to trigger the achievement. If you find your first effigy and immediately run to a Pal Statue to upgrade your stats, you are setting yourself up for failure.
Players are reporting that spending an effigy before securing the other three glitches the tracker. When you finally collect the last one, the achievement simply will not pop. While the developers might patch this later, the safest play is obvious. Hoard them. Grab every single one, make sure your inventory shows four, wait for the achievement notification, and only then spend them on upgrades.

All Yakumo Effigy Locations
To make your hunt painless, here is a quick cheat sheet detailing exactly where you need to go.
| Effigy Number | Broad Region | Exact Location |
| First Effigy | Feybreak | Resting on top of the Oculus Gate |
| Second Effigy | Floating Islands | Near the peak of the bottom right island |
| Third Effigy | World Tree (Ice Zone) | Lodged between the legs of the Anubis statue |
| Fourth Effigy | World Tree (Ruins) | At the base of a square building in Gilded City |
Since you will be traveling through the Feybreak zone to grab that first collectible, you might as well optimize your time and hunt down one of the best endgame mounts while you are in the neighborhood. Check out our Palworld Guide: Best Ways to Farm Jormuntide Ignis to grab an elite Kindling worker before you leave the area.
1. The Feybreak Oculus Gate
Your first target is located in the lower middle section of the Feybreak map. You are looking for the massive Oculus Gate. You do not need to do any crazy puzzle solving here. Just climb or fly straight to the top of the structure, and the effigy is waiting for you right at the summit.
2. The Floating Islands Peak
Next, head over to the newly added Floating Islands biome. Check your map and navigate to the island positioned in the bottom right corner of this cluster. Ascend toward the highest part of this specific landmass. The effigy is sitting out in the open near the top.
3. The Frozen Anubis Statue
This one requires a bit more navigation. You need to head to the top left of the global map toward the World Tree area, specifically into the freezing ice region.
- Fast travel to the Abandoned Laboratory eagle statue.
- Turn completely around and sprint up the staircase.
- Look to your right once you step outside.
- You will spot a massive Anubis statue. Check right between its legs to claim the third effigy.
4. The Gilded City Ruins
Your final stop keeps you in the World Tree region, but you need to travel to the complete opposite side. Head down to the bottom left sector near the Gilded City Ruins. Keep your eyes peeled for a distinct, small square building. Check around the very bottom foundation of this structure to secure your fourth and final effigy.
Verify that you have all four in your bag, wait for that achievement to unlock, and then go enjoy your stat boosts.