Voidling Bound Guide: Evolution, Breeding, and Splicing Blueprint
Stop Wasting Polychrome Mutagens: The Perfect Upgrading Sequence for an Unstoppable Roster
Quick Answer: Maximizing your power in Voidling Bound requires upgrading your squad in a specific order: use the Evolution Chamber and Attributes to stabilize your early game, leverage the Pheromone Nest to breed perfect next-generation stat lines, and save your rare Polychrome Mutagens for the Splicing Station only after your parent bloodlines are fully locked in.
Demystifying the Seven Power Systems
Voidling Bound features seven unique layers of progression, and trying to handle all of them at once is a one-way ticket to wasting rare resources. If you rush into endgame customization before your baseline roster is structurally sound, you will end up burning valuable currencies on creatures that simply cannot compete.
To build an elite squad, you must understand exactly which mechanic governs which layer of your roster.
| Progression Mechanic | Primary Function | Ideal Stage to Prioritize |
| Attributes | Governs baseline stats like health, damage, and stamina | Every single run from level 1 to 20 |
| Evolution Chamber | Unlocks custom element nodes, perks, and active skills | Early to mid-game progression |
| Cerebrum Enhancer | Grants permanent, account-wide upgrades to an entire species | As soon as you commit to a primary species |
| Training Room | Passively levels up benched units while you are on missions | Mid-game roster expansion |
| Pheromone Nest | Breeds parent units to pass down elite stats and Dual Natures | Mid to late-game squad optimization |
| Splicing Station | Fully reorganizes elements, genetics, and custom perk sets | Late-game creation of final builds |
| Catalyzers | Injects up to five highly specialized endgame stat modifiers | Post-campaign Abyss and Void Strike runs |
The Step-by-Step Progression Roadmap
Building an unstoppable creature requires a methodical approach. The chart below maps out your optimal sequence, alongside the exact pitfalls you need to dodge at each phase of your journey.
| Gameplay Phase | Ultimate Objective | Your Best Move | The Trap to Avoid |
| Early Game | Establish a reliable primary combat unit | Max out standard Attributes and commit to the Evolution Chamber | Spreading early resources thin across multiple species |
| Early Cleanup | Build up a robust library of rare genetic traits | Evolve broad species and check rare variants before releasing them | Ignoring unique reward creatures because they look weird |
| Mid Game | Manufacture high-stat parent bloodlines | Use the Pheromone Nest to consolidate elite Natures into single units | Releasing high-potential duplicates for quick pocket change |
| Pre-Splicing | Finalize your ultimate genetic blueprint | Finish all breeding loops before stepping to the Splicing Station | Splicing a unit too early, which permanently locks it out of breeding |
| Late Game | Forge your custom dream build | Use Splicing to combine your favorite elements, skills, and perks | Blowing rare Polychrome Mutagens on experimental whim builds |
| Endgame | Push deep into hyper-scaling challenges | Load up five active Catalyzers and experiment with their load order | Treating end-tier Catalyzers as a substitute for a bad base build |
Tuning Your Baseline Attributes
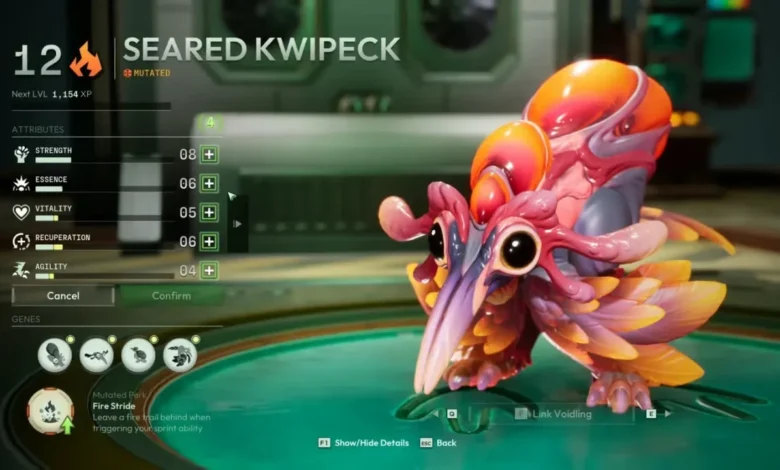
Attributes form the literal bedrock of your creature’s combat performance. Even a fully evolved monster will feel incredibly sluggish or fragile if your points are distributed incorrectly. Your creature is hard-capped at level 20, meaning you only have 20 natural attribute points to distribute. However, advanced breeding can permanently raise the starting baseline stats of newborn offspring, making it entirely possible to hit a perfect 20 across the board on a master-bred unit.
- Strength: Enhances raw offensive output and critical hit damage. Invest here when your survivability is fine but enemy health bars are taking too long to melt.
- Essence: Multiplies your elemental potency and status effect damage. This is a mandatory stat for specialized Poison, Burn, Frostbite, Static, or Disintegration loadouts.
- Vitality: Boosts maximum health pool, active armor values, and total stamina. Prioritize this immediately if you find yourself constantly eating dirt or running out of gas mid-combat.
- Recuperation: Accelerates your weapon reload duration, lowers ability cooldowns, speeds up ultimate generation, and amplifies received healing. This is the ultimate quality-of-life stat for skill-heavy builds.
- Agility: Enhances fire rate metrics, global movement speed, and natural critical hit chance. This is the premier choice for hyper-mobile ranged kiting builds.
Navigating the Evolution Chamber and Cerebrum Enhancer
The Evolution Chamber requires 20 element-specific Mutagens to push a single creature from common rarity up to its final mutated form. Every single node you purchase should serve a distinct purpose. Do not blindly pivot into a new element unless you have consulted your Atlas Terminal to verify the defensive weaknesses of the planet you are currently targeting.
Furthermore, every gene and perk you unlock via standard evolution is permanently logged into your global database. This means evolving an assortment of different species over time is incredibly useful, as it rapidly expands the toolkit available to you once you unlock late-game customization.
While the Evolution Chamber modifies an individual creature, the Cerebrum Enhancer upgrades the entire species across your entire account. Funded by Research Samples gathered out in the field, these permanent upgrades ensure that every single egg you hatch from that specific family down the line starts with a vastly superior baseline. If you find a species you love, dump your samples into the Enhancer immediately to let that passive value compound over time.
Expanding Your Roster via Training and Breeding
Keeping a deep bench is critical, but manually grinding levels for a dozen different pocket monsters is a miserable chore. This is where the Training Room shines. By purchasing dedicated gear from Michael, you can place your bench warmers into passive training slots. They will consistently accumulate experience points and level up in the background while you are actively clearing content with your primary main. Use this system to passively prep backup elemental counters or level up raw parent candidates for the breeding loop.
True min-maxing happens at the Pheromone Nest. Breeding allows you to smash two same-species units together to hatch a superior offspring that inherits traits from both lineages. By default, this inheritance suffers a 50% stat penalty, but buying crucial infrastructure upgrades from Henry will push that retention rate all the way to 100%.
The Pheromone Nest is also your exclusive ticket to unlocking Dual Natures—incredibly powerful, high-tier trait combinations that can only be achieved by matching compatible parent bloodlines. Before you throw away duplicate creatures, inspect their Natures and raw potential; a low-level duplicate with an incredibly rare Nature is worth its weight in gold as a dedicated parent.
If you want to view a full breakdown of the rarest traits and unique abilities you can inject into your breeding pool, make sure to read our comprehensive Voidling Bound Guide: Every Mutated Voidling Unlocked to plan out your ultimate roster.
Remember, once you take a creature to the Splicing Station, it becomes permanently sterile. You must complete every single bit of your breeding and stat-rolling work before you commit to the final splice.
The Splicing Station and Endgame Catalyzers
Splicing is the absolute peak of build customization. For the flat cost of 5 Polychrome Mutagens, the Splicing Station allows you to completely rebuild a chosen creature from the ground up. You can swap out its elemental affinities, entirely rewrite its active ability layout, and stack up to three mutated perks collected from any species you have unlocked across your entire playthrough. Because Polychrome Mutagens are exceptionally rare, treat every splice as a meticulously planned operation rather than a casual experiment.
Once your spliced powerhouse is born, your final step is fine-tuning its performance via the Catalyzer Injector. Acquired by clearing brutal post-campaign Abyss floors or trading with Leon, you can slot up to five active Catalyzers into your creature simultaneously.
Unlike Splicing, Catalyzers can be freely swapped out and reorganized at any time. This flexibility makes them perfect for testing slight structural shifts in your endgame loop. Pay close attention to your slot order, as the sequence in which you equip your Catalyzers can dramatically alter how their mathematical modifiers interact with your stats.
Diagnostic Guide: Fixing Your Build Traps
If your current squad is hitting a wall, use this diagnostic list to identify exactly which progression layer will solve your current mechanical problem.
- Your creature evaporates instantly: Do not look at complex endgame systems. Re-spec your core Attributes into Vitality, grab defensive nodes in the Evolution Chamber, or fund durability nodes in the Cerebrum Enhancer.
- Your outgoing damage feels completely useless: Check your element matchups via the Atlas Terminal. If the element is fine, buy specialized attack nodes in the Evolution Chamber or invest heavily into Strength or Essence attributes.
- Your high-tier backup units are too weak to use: Drop them into the Training Room slots. Let them passively soak up experience in the background while you farm comfortable content with your max-level main.
- Your customization options feel restricted: Go hunt down unique world collectibles and golden rewards. Hatching these rare variants adds exclusive, rule-breaking perks and genes to your global Splicing database.
- High-level Abyss runs or Void Strikes feel mathematically impossible: Your baseline build is likely maximized, so it is time to optimize your Catalyzer Injector layout. Swap the equipment order or farm higher challenge floors to secure tighter modifiers.