Subnautica 2 Guide: How to Unlock and Build the Scanner Station
Stop Swimming Blind and Track Every Resource on the Seafloor With the Ultimate Underwater GPS
Quick Answer: Stop swimming blind and head exactly 240 meters Northeast of your Lifepod to the sunken Camp One wreckage. Scan the broken terminal inside to unlock the Scanner Station, then build it inside your base to instantly track any resource, wreck, or anomaly within a 300-meter radius.
Swimming in circles hoping to stumble across a random deposit of silver gets old fast. If you want to stop guessing and start gathering efficiently, you need a Scanner Station. This base module completely changes how you play Subnautica 2. Once powered up, it acts like an underwater GPS, pinpointing the exact location of the materials you desperately need.
Here is exactly how to find the blueprint, build the room, and fire up your new tracking system.
Where to Find the Scanner Station Blueprint
You only need to scan a single fragment to unlock the full blueprint. While there are a few broken stations scattered around different points of interest, the absolute easiest one to grab is sitting at Camp One.
This ruined colonist base is basically right next door to your starting area. Just follow these steps to reach it:
- Float directly underneath your Lifepod and pull out your compass.
- Face Northeast until your HUD arrow sits perfectly on the 60 marker.
- Swim in a straight line for 240 meters.
- Look straight down toward the seafloor to spot the long, connected corridors of Camp One.
- Swim down and enter through the hatch located near the bottom of the structure.
- Swim upward through the vertical corridor into a room tilted at an awkward 80-degree angle.
- Look at the floor, pull out your Scanner, and scan the fragment.

Constructing Your New Tracking Room
With the blueprint secured, head back to your seabase. Grab your Habitat Builder and prepare to spend some resources.
| Required Material | How to Craft or Find It |
| 3x Titanium | Easily farmed from surface nodes and shallow caves right near the Lifepod. |
| 1x Wiring Kit | Crafted at a Fabricator using 1x Silver and 1x Copper. Look for Silver in the caves roughly 200 meters North of the Lifepod. |
| 1x System Chip | Crafted at a Fabricator using 1x Wiring Kit and 1x Quartz. You can grab Quartz from the glowing Coral Domes in the starting biome. |
Keep in mind that you actually need two separate Wiring Kits to build this module, since the System Chip requires one as an ingredient.
Since you are heavily expanding your base and diving into advanced electronics, you will need plenty of refined materials to keep upgrading. Make sure to read our Subnautica 2 Guide: How to Build Processors and Craft Ingots to get your industrial production lines running smoothly.
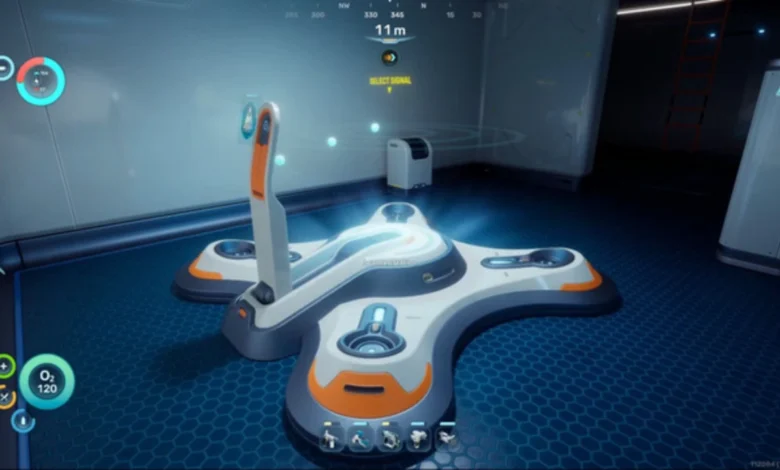
How to Track Resources
Once you build the Scanner Station, it creates a massive 600-meter wide tracking sphere centered perfectly on your base. Nothing hides from it.
Walk up to the podium in the center of the room and interact with it. You will see a list of every single ore, Alterra Base, Cicada Wreck, and Bloom Infestation currently sitting within that 300-meter radius. Select what you want to find, and the room will generate a glowing 3D hologram showing all available nodes.
Click on any of the floating orbs on the hologram. This drops a waypoint directly onto your HUD, letting you swim straight to the target without checking your map.
A Quick Warning About Power
This incredible technology comes with a massive downside. The Scanner Station drains 10 energy units per second while active. If your base runs on a single solar panel, this module will trigger a blackout almost instantly. Build a proper power grid before flipping the switch.
Also, remember that a single station can only track one resource type at a time. Switching targets instantly deletes your previous waypoints. You can theoretically build multiple Scanner Stations in the same base to track different items simultaneously, but the insane power draw makes this a terrible idea for early-game bases. Just toggle your signals manually in the menu to keep things organized.