Outbound Guide: How to Stop Engine Overheating and Cool It Down
Keep Your Camper Van Running with the Cooling System Upgrade
Quick Answer: Keep an eye on the temperature gauge next to your speedometer. If your engine dies, step out of the van to let it air cool, or pour water directly onto the engine block for a faster fix. To permanently stop the overheating issue in the canyons, unlock and craft the Cooling System Upgrade using Hardened Metal, Electronics, and Water.
Hitting the open road in the northwest section of the canyons biome is a brutal reality check. Suddenly, your trusty camper van cannot handle the intense desert heat. After about thirty seconds of driving in this specific zone, your engine will completely overheat, stall out, and leave you stranded.
Constantly breaking down makes exploring landmarks and hacking signal towers incredibly frustrating. Here is exactly how to manage your engine temperature on the fly and how to permanently upgrade your van to conquer the heat.
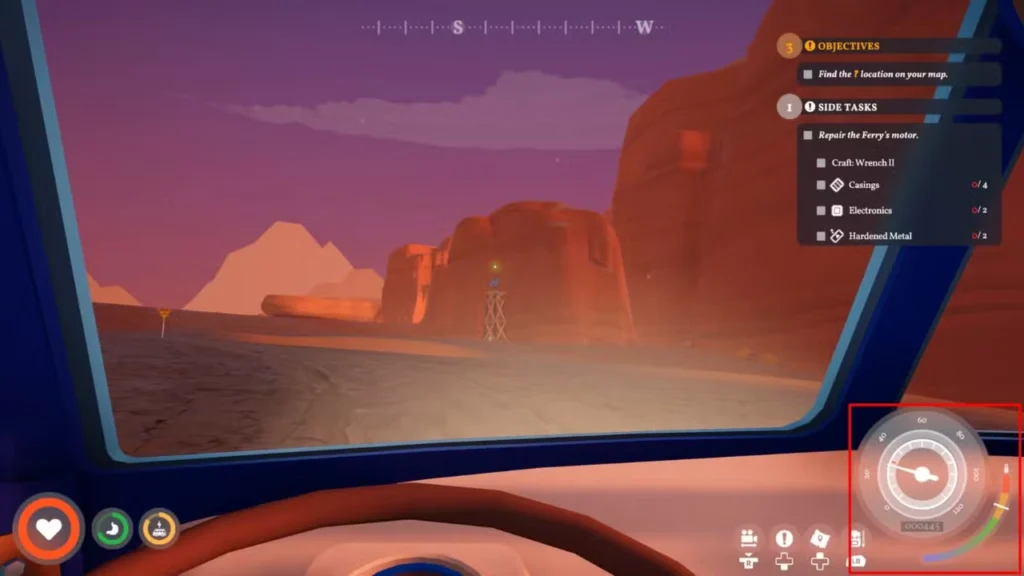
Reading the Temperature Gauge
You can monitor your engine’s status by checking the colorful gauge located in the bottom right corner of your screen, directly next to your speedometer.
As you drive through hot zones, the white indicator line will steadily climb. Once that line crosses into the red section and stays there for about 5 to 10 seconds, the engine shuts off completely. You cannot start the van or drive an inch until the temperature drops.
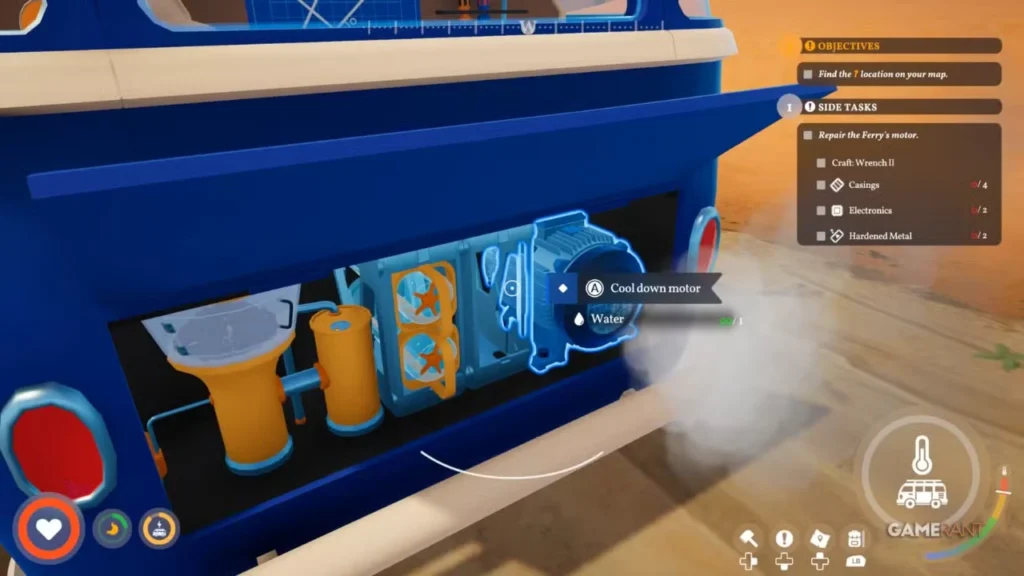
How to Cool Down a Stalled Engine
When the engine dies, you have two options to get back on the road:
- Passive Air Cooling: Simply hop out of the driver’s seat. While you are standing outside, the engine temperature will slowly drop on its own.
- Active Water Cooling: For a much faster fix, walk around to the engine bay at the rear of your van. Interact with the engine block to pour water directly onto it.
Every single pour of water instantly drops the temperature gauge by roughly 25%. If your water reserves are running low, just pour one unit to get the needle out of the red zone and let the passive air cooling handle the rest.
If you are just entering the canyons, you probably just crossed the massive bridge connecting the biomes. Before you get too deep into this harsh new territory, make sure you didn’t miss any free objectives behind you! Check out our Stormhold Overpass Lookout guide to clear that lingering quest off your log.
Crafting the Cooling System Upgrade
Manually pouring water on your engine every thirty seconds is miserable. To fix the problem permanently, you need to install the Cooling System Upgrade. This is a two-step process that requires specific materials for both unlocking the blueprint and actually building the part.
First, access your Vehicle Research Station to buy the schematic:
| Research Station Costs | Quantity |
| Hardened Metal | 2 |
| Electronics | 4 |
| Water | 10 |
Once the research is complete, walk over to the Workbench located above your rear engine bay to actually craft and install the part.
| Workbench Crafting Costs | Quantity |
| Hardened Metal | 5 |
| Electronics | 4 |
Sourcing Hardened Metal
Hardened Metal is the biggest roadblock for this upgrade. You manufacture it by placing Red Ore into a Metal Smelter.
To make this process as painless as possible, change your driving route. Instead of pushing straight into the scorching northwest section of the canyons, explore the northeast side first. The northeast cliff faces are packed with Red Ore, and your engine will not overheat in that specific area. Farm your ore, smelt your Hardened Metal, and install the cooling system before you ever have to deal with a stalled van!
If you want to master every aspect of your campervan adventure, be sure to check out all of our other guides at Novus Vektra.